With the Visual Studio 2008 Visual Basic templates,
you can quickly and easily get started with the first service. Begin by
opening Visual Studio 2008. If you are launching Visual Studio for the
first time, you can select the Visual Basic Settings in the Settings
dialog box that appears automatically if you want to set help filters
and keyboard shortcuts to Visual Basic.
From
the File menu, select New Project. For the Project Type, expand Visual
Basic and then select Windows. In the Templates pane, select Windows
Service. In the Name text box, type Tutorials. Verify that you have the .NET 3.5 SDK selected in the drop-down box above the Templates pane, and then click OK.
Note
If
you are using the Express version of Visual Studio Basic, the Windows
Service template may not be available to you. You can look on
Microsoft’s MSDN site for templates or download the Professional
version. |

In
the Solution Explorer, you will see Tutorials, under which you will
then see My Project and then Service1.vb. Service1.vb holds the
wizard-generated code that holds the required components, methods, and
entry points to create and compile your service. Currently it is empty
except for stubs for the <OnStart> and <OnStop> methods.
Renaming Our Project Files
Now
that we have wizard-generated code ready, we want to properly identify
the service and rename the wizard-generated labels. Service1.vb
represents the service. For this reason, rename the Service1.vb file Tutorials.vb. At this point, the solution, the project, and the service should all be named Tutorials.
Note
If
the solution is not visible, go to Tools, Options, Projects, and then
Solutions. Select the check box labeled Always Show Solution. |
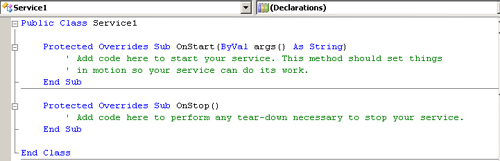
Understanding the Wizard Code
Let’s
start by reviewing the code generated by the wizard. Right-click the
Tutorials.vb file and select View Code. You will see the class
definition along with two methods, <OnStart> and <OnStop>. They are both blank, but they are both required for your service to run properly.
The <OnStart> Method
The <OnStart>
method represents the entry point into your service. This is what the
underlying Service Control Manager (SCM) will call when the user clicks
Start on the Control Panel Services screen. You will notice that <OnStart>
has one argument. This argument contains the parameters defined in the
Administrative Tools, Services, Service Properties. This is where the
application is started and also where we will later add functionality
that will make the service useful.
Note
The
Service Control Manager is the centralized administrative authority
over how services are installed, configured, and ultimately run. |
The <OnStop> Method
The <OnStop>
method represents the exit point of your service. This is where we want
to add cleanup code. It will be called when the user clicks Stop on the
Services tab under Administrative Tools.
Other Events
Services support more than just the <OnStart> and <OnStop> events. Two other very important events are <OnPause> and <OnContinue>.
<OnPause>
allows a user to temporarily suspend operation of your service without
shutting it down. At times you might want to debug your service or you
might need to perform an action on a server that your service relies
on. Allowing it to run while you perform your maintenance could be
detrimental. If your service supports <OnPause>, you should implement the method to react to the pause event.
To use the OnPause and OnContinue methods, you must first enable these features in your service by following these steps:
1. | Double-click Tutorials.vb in the Solution Explorer to open the Tutorials.vb Design window.
|
2. | Left-click in the Design window to view the Tutorials.vb Design Properties tab.
|
3. | Set the CanPauseAndContinue property to True.
|
Note
If you do not see the Properties tab you can select View from the menu bar and then select the Properties Window. |
Adding <OnPause>
In the Solution Explorer, right-click the Tutorials.vb and select View Code.
Below the current <OnStop> method, type Protected Overrides Sub <OnPause>
and select Enter. As you type this, you should notice that the options
for different methods to override appear in the IntelliSense.
You will notice that a single piece of code, <MyBase.OnPause()>,
will appear in your method definition. This allows your service to call
the base class just in case you have implemented some general code in
it. Since we have not, you can remove this code by highlighting it and
deleting it. We will not be adding any code to this method at this time.
Adding <OnContinue>
<OnContinue> is the counterpart to <OnPause>. Once a service is paused it will need to be resumed. This is where <OnContinue> comes in. As we did with <OnPause>, we will add this method by typing in the following code below the <OnPause> method: Protected Overrides Sub OnContinue. Now click Enter. Once again you will see its implementation appear with the <Mybase.OnContinue()> code. Again, merely highlight this and delete it.
Now we will create the code to make the service useful.